
Want us to reserve this item for you?
Many of our items are in high demand — some even have waiting lists due to team orders.
Leave your email, and we’ll hold this one for 48 hours + send a reminder.
Ignis Pixel props are strong enough to survive occasional drops and impacts. However, bear in mind that this is a technically complex device. Be careful with it and use training dummies for practice. It will help to make the life of your pixel equipment much longer.
We give 1-year warranty for most of our products (for Jump Rope - 6 months/20.000 jumps, whatever comes first), 15-day moneyback period and free technical services including free repairs during warranty period. If there is something wrong with your props, please get in touch with our support team by email: support@ignispixel.com
The time of working without charging varies from 1,5 to 8 hours and depends on a number of factors: a model of product, battery power, brightness, pictures (the more white light on a picture, the more energy that picture consumes). Anyway, even in the least economical mode the device works much more than the time of an average performance on scene.
All models are convertible. Short poi (32Tech, 48Lite, 80HD Tech) can be used a nunchaku, just change the loop. Attach poi to a staff connector and you get a staff.
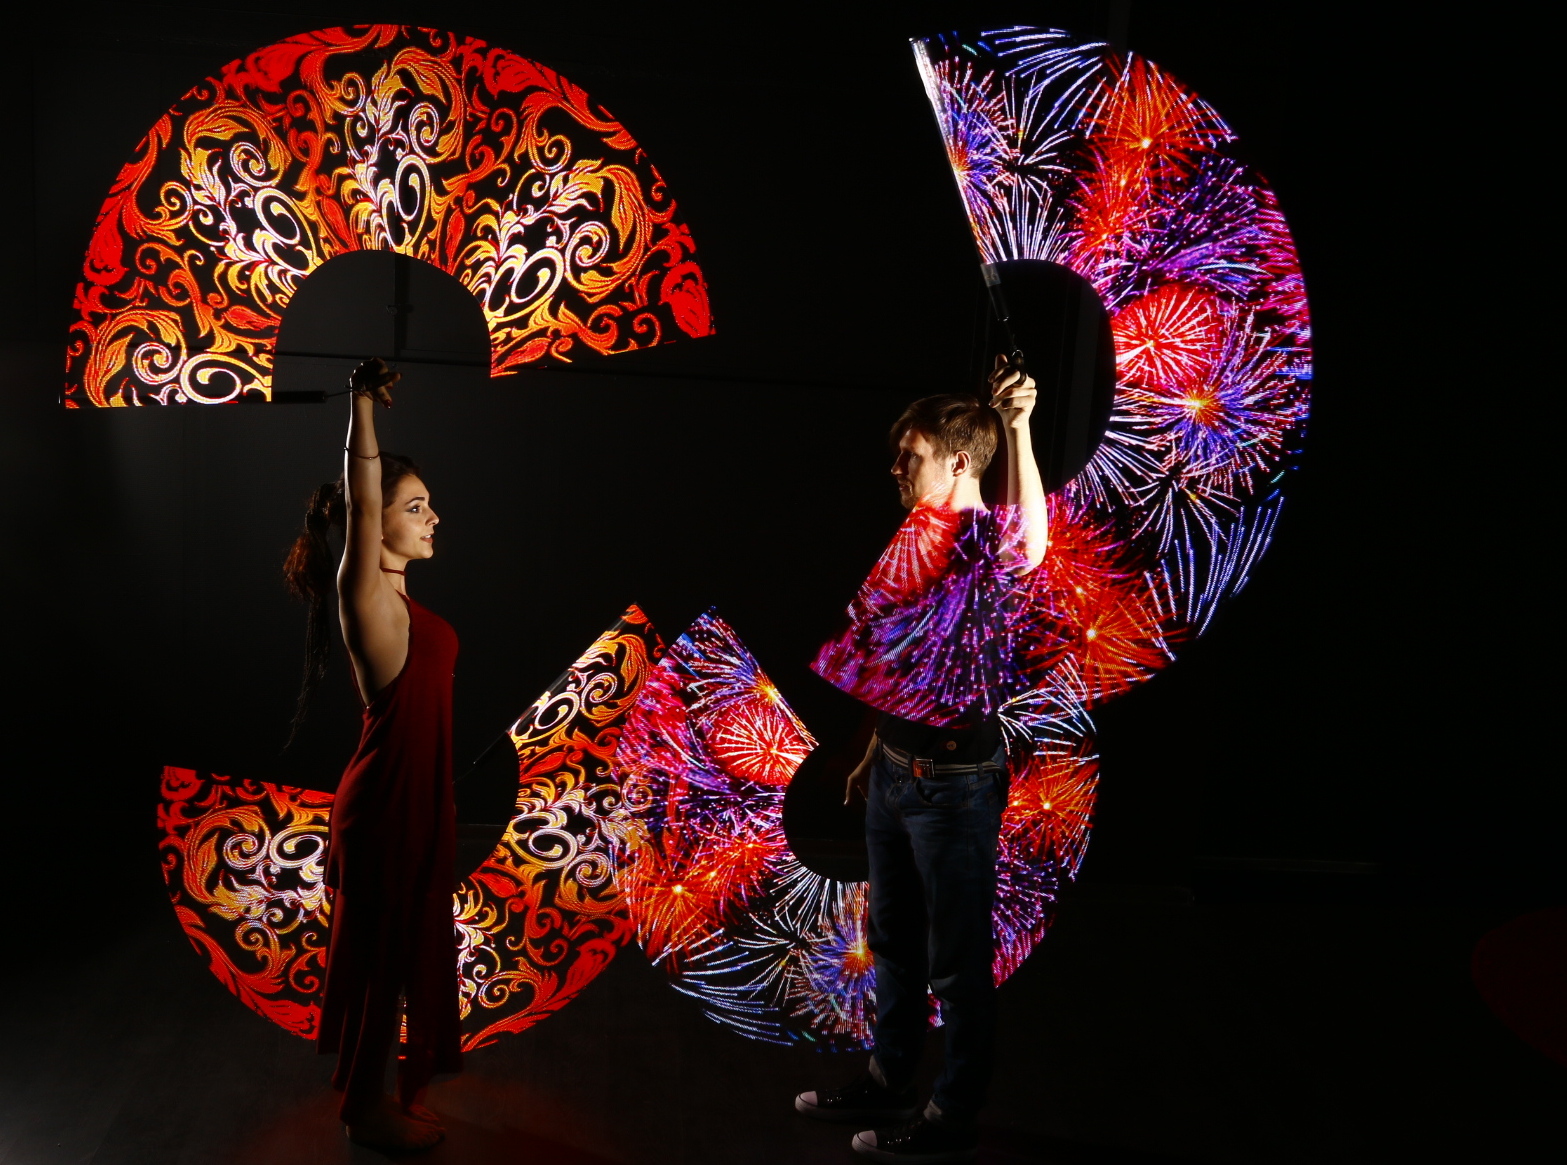
All Ignis Pixel props are programmable; you can upload any pictures into them, all graphic files: jpeg, bmp, png, etc. For your comfort, we have a pack of designed pictures that you can get from our download section on the website, and those pictures look really good.
https://ignispixel.com/downloads
You can upload a .gif file, but it will be static. Operation principle of pixel props is based on displaying of an image as a succession of rows per unit of time, unlike video that consists of definite number of frames per unit of time. That is why any animation doesn’t work for pixel props where LEDs are placed in a row. You can make a static picture in the air that can be changed by another static picture.
You can upload into the device any picture, any graphic file, any text or word. You can do it as a picture, or use a built-in text editor inside Ignis Utility. To make the text look better, shift its upper edge to the upper pixels, because they have wider amplitude when you spin them, and your text will be clearly visible.
The Ignis Pixel mobile application is available for BubblePoi, JellyPoi, Fans, Buugengs , Juggling props , Pixel Sticks and Hula Hoops. Operations are carried out through Bluetooth.
You can upload a music file into the Software and make your project of pictures in accordance with it.
Before starting to shoot, you have to prepare a project with pictures in Ignis Utility or in Ignis Pixel mobile app, setting the brightness of the pictures on 12-25%. This is necessary to equalize poi luminosity and background brightness to gain correct exposure.
For shooting, you can use a cellphone or a camera. We recommend using a cam with "global shutter", not a "rolling shutter". For the best result make video with moderate light. For outdoors the best time is at sunset in the shadow using green trees as background or within an hour after sunset. If you make video indoors don’t switch off the light. Or highlight the person by a lamp or flashlight Otherwise you won’t see the person on video. Use dark or black background. If you use bright background, you won’t see poi trails on video. Don’t forget to clean the lens, otherwise you will ruin all your efforts!
1. Camera settings
Select manual mode М on your camera. If you use iPhone we recommend application ProCam (ProCam 5 by Samer Azzam), it costs around $6. Link:
https://itunes.apple.com/app/procam-5/id730712409⠀
Other applications for shooting are also worth trying. Choose video with rendering speed 25-30 FPS (frames per second). Set shutter speed according to rendering speed. For 25 FPS set 1/25 sec, for 30 FPS set 1/30 sec. Set sensitivity ISO 100 or lower.⠀
Use "Night" camera mode if the camera doesn't have manual settings. This will make the shutter speed slower and trails longer. Filming through the sunglasses is a good idea as well.
In any case, you should see normally exposed poi trails and the performer clearly on the camera screen.
2. Try to make video of a person spinning poi
3. Adjust brightness for poi trails
Look at the trace after poi on video. If the trace looks too bright and colors become white, reduce ISO value. If it looks too dark, increase ISO.
4. Adjust brightness of the person and background
After you have found optimal ISO value, look at general brightness of the person and background. If the person looks too dark, choose a brighter place to shoot video (but don’t forget about background – for best result it should remain dark or black), or you can highlight the person by lamp or flashlight. If the person looks too bright, choose a darker place for video – find a darker shadow or wait for sunset.
Finally, you will get some result of your shooting. Whatever you got, bear in mind that camera doesn't see poi trails like a human eye does, so some post-processing is necessary, for example, Echo effect to make the trail length longer as you can see with your eye.
Anyway, try to make video according to this manual and tag #ighowtomakegoodvideo in facebook, instagram or another social for we could see your results and help you to improve it :)
Good luck!
Many of our items are in high demand — some even have waiting lists due to team orders.
Leave your email, and we’ll hold this one for 48 hours + send a reminder.
Looks like you picked something special. Place your order within 24 hours and get a free branded t-shirt with your gear.
Order in 24h = get a free Ignis t-shirt
